The Amount of Sand Required for a Sandbag Dike calculator computes the volume of sand needed for sandbag dike (3x1) based to height and length of the dike.
INSTRUCTIONS: Choose units and enter the following:
- (H) Height of Dike
- (L) Length of Dike
Volume of Sand (V): The calculator returns the volume of sand needed for the dike in cubic yards. However, this can be automatically converted to other volume units (e.g. cubic meters, cubic feet) via the pull-down menu.
The Math / Science
The recommended dimensions for the cross section of a sandbag dike is three to one (3x1) for the base verses the height respectively. This equation returns the approximate volume of material (e.g. sand in bags) needed based on the ratio assumption and the height(H) and length (L) of the dike. Note: the height should be at least one foot above the expected level of water.
The Sand Required for a Sandbag Dike calculator helps you estimate the amount of sand you will need on site to build a sandbag dike. It's based on the paper Sandbagging for Flood Protection by Dr. Hellevang captured in the Sandbag Wall Calculator.
To be prepared for a flood with a sandbag dike, you need:
- a good plan to build a sandbag dike,
- to estimate the number of sandbags you will need to build the dike,
- to estimate how much sand you need to fill the sandbags,
- to have the materials on site, and
- to estimate how much time it will take to build the sandbag dike with the help you have.
Sandbag Wall Calculators
- Sand and Sandbags for a Dike (3x1) - This calculates the number of sandbags and volume of sand needed for a 3x1 depth to height ratio sandbag dike.
- Width of Sandbag Dike Base - Compute the width and number of bags for the cross-section base of a 3x1 sandbag dike.
- Sand for a Dike - This calculates the volume of sand needed for a flood prevention dike.
- Sandbags in a Wall - This calculates the number of sandbags needed for a wall that is only one bag thick.
- Sand Required for a Wall- This calculates the approximate amount of sand needed for a one bag thick wall.
- Time to Fill the Sandbags - This calculates the approximate amount of time to fill a number of sandbags.
- Weight of Sandbags - This calculates the load weight of a number of filled sandbags.
- Weight of Sand - This calculates the approximate weight of a volume of sand (wet, dry, loose or packed)
- Price of Sand - Computes total cost of a volume of sand based on the price per ton.
Sandbagging for Flood Protection
Kenneth Hellevang, Extension Engineer. NDSU Extension Service North Dakota State University February 2011
by Kenneth Hellevang, Extension Engineer
A sandbag dike must be built properly to prevent or reduce flood damage.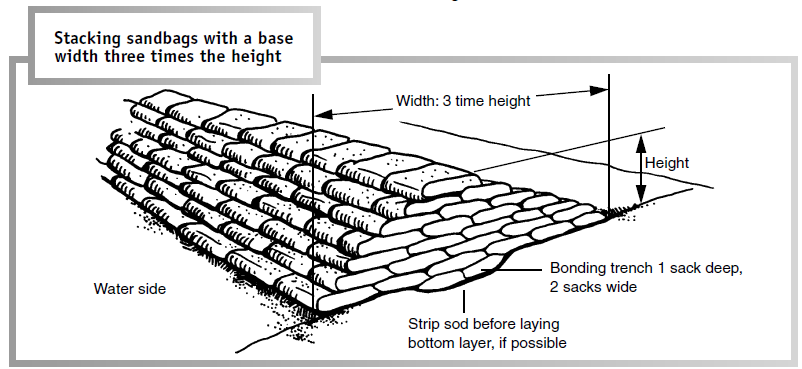
Managing Volunteers
Since a dike will fail if not built correctly, training people on proper procedures for placing sandbags is very important. In the rush, volunteers will do something, but the result frequently is a dike that performs poorly or fails. Put a high priority on planning and organization. Identifying a supervisor for the project is recommended.
Sandbags
Bags are made from various materials, but the most common is woven polypropylene. They usually measure about 14 inches wide and 24 to 26 inches long. Other sizes of bags also are available, but bags are easier to handle if their weight with filling in them is limited to 35 to 40 pounds. Sand is the easiest material for filling and shaping sandbags. Silt and clay in bags will form a good dike, but working with those materials is more difficult. Fill sandbags slightly more than one-half full. Contact your county emergency management office for information on where to obtain sandbags.
Site Selection
When selecting the location for the dike, take advantage of natural land features that keep the dike as short and low as possible. Avoid obstructions that would weaken the dike. Do not build the dike against a building wall due to the forces the dike may place on the building. Leave at least 8 feet to maneuver between the dike and buildings for observation, pumping seepage water and other activities. Since friction holds a dike from sliding, create a good bond between the ground and the dike. Remove ice and snow since it will melt permitting water to flow under the dike. Remove anything else that is “slippery.” If the dike is to be more than about 3 feet high, dig a bonding trench where the dike will be placed if possible. The trench should be about 4 to 6 inches deep and 18 to 24 inches wide.
Estimate Sandbags Needed
Build the dike at least 1 foot higher than the projected crest level to allow for fluctuations in the water level. Local experience will assist in determining the amount of freeboard (the distance from the highest floodwater level to the top of the dike) to provide. The U.S. Army Corps of Engineers recommends building a dike with a width at the base that is three times the dike height. For example, a 4-foot-high dike would have a base width of 12 feet. The corps indicates that each foot of finished dike length requires one bag, each foot of height requires three bags, and each 2.5 feet of width requires three bags. This results in each bag having placed dimensions of about 4 inches high by 10 inches wide by 14 inches long. Use the following equation to estimate the number of bags required per linear foot of dike for a dike with a base width that is three times the height.
N = (3 x H) + (9 x H x H) / 2
N – Number of bags required per linear foot of dike
H – Dike height (feet)
Example:
Estimate the number of sandbags required per linear foot for a dike 3 feet tall. N = (3 x 3) + (9 x 3 x 3) / 2 = 45 bags The estimated number of bags needed for 100 linear feet
of dike is:
1-foot-high dike: 600
2-foot-high dike: 2,100
3-foot-high dike: 4,500
4-foot-high dike: 7,800
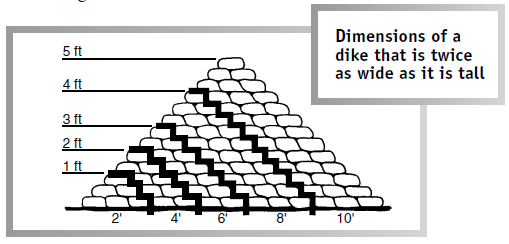
A common recommendation is to make the dike twice as wide as its height. This is a minimum width-to-height ratio that should be used. The estimated number of bags needed for this ratio is in the following table. This is based on each bag having placed dimensions of about 4 to 5 inches high by 9 to 10 inches wide by 14 inches long. The estimated number of bags needed for 100 linear feet of dike that it twice as wide as its height is:
1-foot-high dike: 600
2-foot-high dike: 1,700
3-foot-high dike: 3,000
4-foot-high dike: 5,500
5-foot-high dike: 9,000 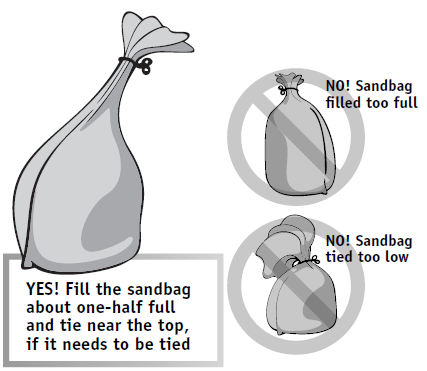
A cubic yard of sand will fill about 100 30-pound sandbags or about 75 40-pound bags, assuming the sand weighs 110 pounds per cubic foot. Sand weighs 100 to 130 pounds per cubic foot, depending on moisture content and packing. A cubic yard is 27 cubic feet. Each 14-inch by 24-inch bag will hold about 0.4 cubic feet if filled about one-half full. Based on volume, each yard will fill about 67 bags one-half full.
Filling Sandbags
Fill the bags about one-half full and tie the bag near the top, if it is tied, which permits the sand to move easily in the bag to create a good dike. Overfilled bags and bags tied too low leave gaps in the dike, which allows water to seep through. Sandbags do not need to be tied unless they are transported. Filling sandbags usually is a two person operation. One member of the team holds the bag on the ground slightly in front of his or her spread feet and the second shovels the sand into the bag. Use gloves to protect the bag holder’s hands. The use of safety goggles is desirable, especially during dry and windy days. For large-scale operations, filling sandbags can be expedited by using bag-holding racks, funnels on the back of dump trucks used for sanding operations and various power loading equipment. However, the special equipment required is not always available during an emergency.
Stacking Sandbags
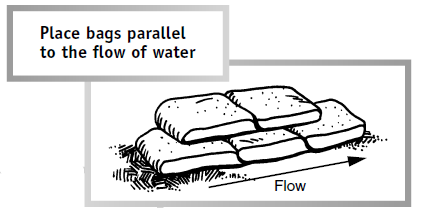
Lift bags using your legs and limit twisting of your back. Gently hand the sandbag to the next person in a sandbag brigade or line. A triangular or pyramid shape for the dike is not necessary if the height will be 1 foot or less. Support the wall of sandbags with “clusters” of bags every 5 feet to stabilize the sandbag wall so it 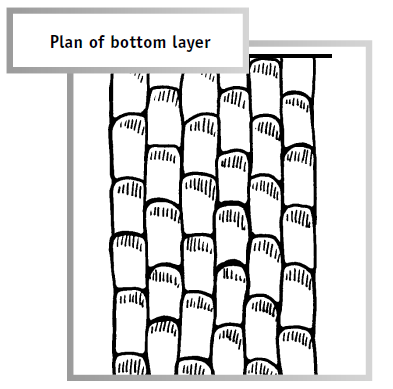 does not tip over from the force exerted by the floodwater. Place the first layer of bags lengthwise on the dike (parallel to the flow), lapping the bags so the filled portion of one bag lies on the unfilled portion of the next, with the tied or open end of the bag facing downstream. Offset adjacent rows or layers by one-half bag length to eliminate continuous joints, similar to what is done laying bricks. Compact and shape each bag by walking on it to develop dike strength and create a tight seal. Continue to walk on the bags as succeeding layers are placed.
The base of the dike should be about two to three times as wide as the dike is high to provide adequate strength and friction surface area. Water exerts a tremendous force against the dike. Estimate the pressure on the dike base by multiplying the water depth by 62 pounds. For example, the pressure that 5 feet of water exerts on the base of a dike is about 310 pounds per square foot. The force of 5 feet of water on a vertical wall is about 775 pounds per linear foot of wall. Flowing water striking the dike exerts even more force on the dike. A triangular shaped dike permits the weight of the water to push down on the dike to help hold it in place.
Sealing the Dike
The finished dike should be sealed with a sheet of plastic to improve water tightness. Spread a layer of soil or sand 1 inch deep and about 1 foot wide along the bottom of the dike on the water side. Lay polyethylene plastic sheeting so the bottom extends 1 foot beyond the bottom edge of the dike over the loose soil or sand. The upper edge should extend over the top of the dike. Poly sheeting at least 6 mils thick is preferred. It generally is available in 100-foot rolls from construction supply firms, lumberyards and farm stores. Do not put plastic sheeting under the bags since that will increase the potential for the dike to slide. If more than one sheet of plastic is used, the poly sheeting should be placed from downstream to upstream and the next sheet upstream overlapped by at least 3 feet. Overlapping in this direction prevents the current from fl owing under the overlap and tearing the poly loose.
Lay the plastic sheeting down very loosely. The pressure of the water will make the plastic conform easily to the sandbag surface. If the plastic is stretched too tightly, the water force could puncture it. Place a row of sandbags on the bottom edge of the plastic to form a watertight seal along the water side. Place sandbags to hold down the top edge of the plastic. Avoid puncturing the plastic with sharp objects or by walking on it.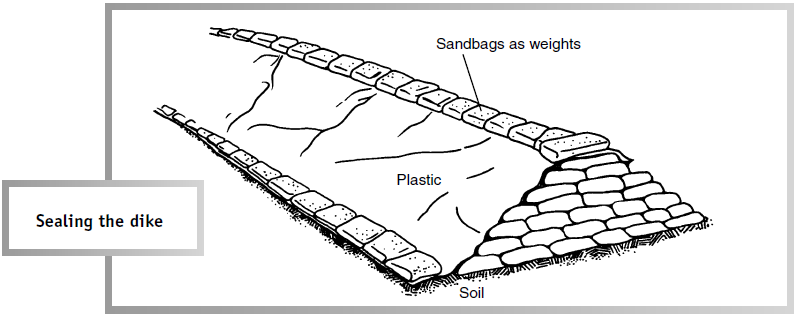
Controlling Seepage
Use a sump or skimmer pump to remove water that permeates through the dike. A 5-gallon pail with numerous holes drilled in the side and placed in a hole dug into the ground can be used as a sump to collect seepage water. Use ground fault circuit interrupters on circuits or extension cords to reduce the risk of electrocution.
Disposing of Used Sand
Floodwater is generally considered as polluted, so sand from bags exposed to flood water should not be used for children’s sand boxes. It can be used for typical construction applications.
Reference
- Copied from Sandbagging for Flood Protection AE-626 (Revised) by Kenneth Hellevang, Extension Engineer: North Dakota State University Extension Service (Fargo, North Dakota Februrary 2011) under the Creative Common license.
- This material is based upon work supported by the National Institute of Food and Agriculture, U.S. Department of Agriculture, under Agreement No. 2009-41210-05965.
